

How To Get A Weathered Look On Wood
1 / 23
The Get-go Step in How to Make Distressed Wood
Earlier you start learning how to make forest await old, determine merely how old you'd like it to appear. The methods used to brand lumber from trees evolved over the centuries. The marks left behind can be roughly linked to various historical periods. So you need to outset determine on the wood distressing techniques you want to utilize.
two / 23
Wood Distressing Techniques: Choosing An Era — Early on
The earliest boards and beams were cutting and shaped with hand tools. If you'd similar an earlier, more archaic wait, we'll show you how to brand wood look sometime when you add together marks that propose hand-hewing, similar this example. (Full instructions coming up.)
Next, learn how to create your own antique painted cabinets.
3 / 23
Wood Distressing Techniques: Choosing an Era — Later
Sawmills became widely used in the 1800s, leaving a telltale, repetitive pattern of blade marks on the forest.
four / 23
Select Wood With Character
When choosing your lumber, look for boards with imperfections, such as knots, cracks and checks. These flaws help make new wood wait old. For this demonstration, we will exist using 1-inch past 10-inch standard pine to show y'all how to make wood look old.
5 / 23
Base Texture #1: Manus-Hewing — Gouging
Hand-hewing was the process of making a round log into square beams or boards using tools such as axes, adzes and hatchets. If y'all desire your piece to propose an earlier historical era, create the look of hand-hewn lumber. It'due south a dandy starting point in making new wood look former.
With an electric paw planer, brand brusk, deep, random passes over the surface of the lath, ever going with the grain. Instead of the smooth, long motility you'd usually use with a planer, call up of it every bit "scooping upward" the wood with every pass. Make sure to become all the way to the edges of the board.
For your other projects, here's how y'all should really use an electrical planer.
half dozen / 23
Base Texture #one: Mitt-Hewing — Adze Marks
Actual hand-hewing involved gouging out chunks of wood with an adze. This left not simply a scoop marker, but also a hard edge where the adze dug into the wood. You can simulate this marker using a masonry chisel. Position the chisel at 1 stop of the gouges and requite information technology a good whack with a hammer.
This step is easier with a sharp chisel. In case you don't already know, here's how to sharpen a chisel.
7 / 23
Base Texture #1: Mitt-Hewing — Smoothing
Using a random orbital sander with a 120 grit disk, smooth out the planer marks so at that place are no difficult edges, and knock down whatever splinters created past the chisel. When you're washed, y'all should have a lath with a gently undulating surface and hard gashes against the grain.
You might exist wondering if it's really necessary to use a random orbital sander. Yep, it is! A standard orbital sander tin leave circular marks on your project—a sure sign that it's not quondam wood.
Here's the divergence betwixt a random orbital sander and an orbital sander.
eight / 23
Base of operations Texture #2: Skip-Planing
To suggest a slightly more recent historical menstruation, you tin can recreate the appearance of saw marks. You tin reproduce the classic circular saw pattern by slightly bending 1 molar of a tabular array saw bract, then scuffing the surface of your board, with the blade barely touching it.
Simply in that location's some other a way to get sawmill marks that'due south easier and doesn't ruin a blade. Just swipe a reciprocal saw horizontally across the board. This volition exit a straight blueprint perpendicular to the grain that's reminiscent of a sawmill process chosen skip-planing. If your bract isn't long plenty to cover the unabridged surface, turn the board around and work from the other side. Try to avert overlapping the previous marks, though.
This technique works all-time with a medium-toothed blade, such equally a pruning blade. Run into "There'south a Blade for That: The Many Types of Reciprocal Saw Blades."
9 / 23
Dents
Historically, whether a lath was hewn by hand or mechanically in a sawmill, subsequent signs of aging would have been made on peak of those marks. Yous can apply the remainder of these techniques that brand new woods look erstwhile on either a hand-hewn or skip-planed base of operations texture. We'll start with dents, all-purpose habiliment-and-tear marks.
Hit the board repeatedly with a short length of chain. Be certain to vesture eye protection and gloves, equally the chain can bounce back at you. Or just place the chain on the board and hit it with a hammer. Be sure to move it effectually the board and go along the marks every bit random equally possible. Don't forget to dent up the board'southward edges, likewise.
Of form, your hammer tin do a lot more than than brand dents. Check out these 10 awesome hammer hacks.
12 / 23
Hatchet Marks
Utilize a masonry chisel to make marks along the edge of the lath. If you're going for the hand-hewn look, employ generously to suggest hatchet marks made when the board was shaped. On a skip-planed board, sprinkle them hither and in that location as general habiliment-and-tear marks.
13 / 23
Rounded Edges
Take a wood rasp to the sharply cut edges of your modern board and smooth them down. Go lightly over hatchet marks so y'all don't eliminate them entirely. Round the corners of your board to suggest random wearable.
14 / 23
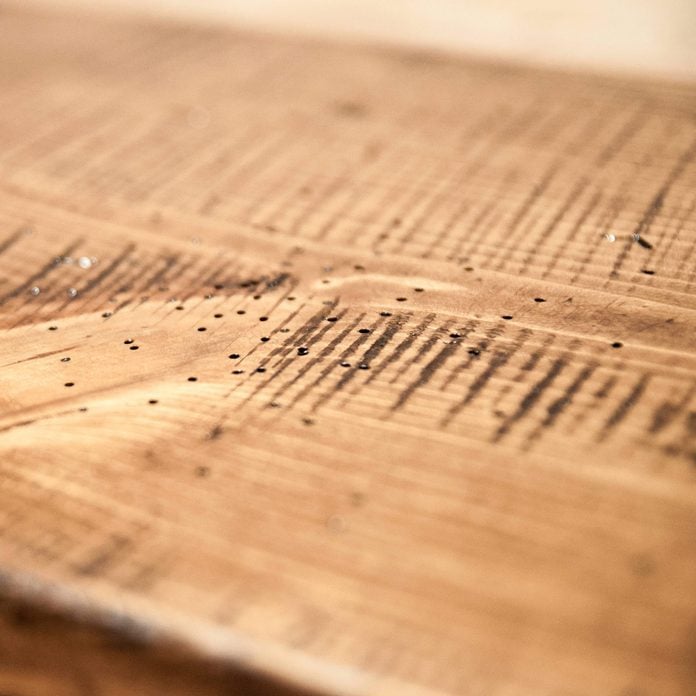
Worm Holes
Worm holes actually help make new wood look old. Use a small drill bit or Dremel rotary tool bit to drill the holes. (We used a 3mm Dremel cutting bit.) Cull an area on your lath where yous will concentrate about of the holes. Scatter holes lightly elsewhere. Drill most holes straight downward. Randomly, drill some at an bending.
Don't have a Dremel tool? Yous should. It's one of the 12 Tools Worth Splurging On.
15 / 23
Worm Trails
Using an engraving or cutting fleck, describe short trails on the surface of the board, drilling a pigsty in 1 end. About trails should be with the grain. Use worm trails sparingly for the most natural wait.
16 / 23
Sand the Lath
Sand the lath thoroughly with 120 grit sandpaper, making sure to clean off whatever splinters.
21 / 23
Finish with a Top Glaze
We used two coats of Minwax Fast-Drying Polyurethane to seal the wood and protect it from moisture. You may want to experiment with other types of "old world" height coats that help make new wood look old, such as a beeswax/turpentine cease or hand-rubbed tung oil.
Hither's how to achieve a flawless wood finish with rub-on oil.
22 / 23
Era-Appropriate Hardware — Hand-Hewn
You can help brand new wood await onetime by pairing the style of hardware for your project with the base of operations distressing technique that y'all chose. For hand-hewn pieces, apply hand-forged or cut nails. Drill a pilot hole, and make certain the long edge of the nail goes with the grain.
Originally Published: January sixteen, 2019

How To Get A Weathered Look On Wood,
Source: https://www.familyhandyman.com/list/how-to-make-new-wood-look-old/
Posted by: smithconces1961.blogspot.com
0 Response to "How To Get A Weathered Look On Wood"
Post a Comment